DotNetNuke Content Localization
DotNetNuke (DNN) is one of the largest open source content management systems (CMS). DNN is built on Microsoft .Net technology and MS SQL database.
DNN is very flexible and customizable. It is simple to install and is designed to be user-friendly, so non-technical users can easily change their content by adding pages and changing layouts. DNN provides thousands of modules, which allow users to customize their website’s look and feel, as well as its functionality.
Additionally, the DNN CMS has a built-in localization framework, which helps users create multilingual websites. The content localization feature was first introduced in DNN version 5. It is designed to allow users to publish different translations of their website pages. In DNN version 7, the localization feature was significantly improved.
In this article, we will discuss the DNN content localization feature, as it is one of the most important and complex features of the platform.
Content Localization Feature
DNN’s content localization framework makes it easy to create a multilingual website in a few steps.
The first step is to enable content localization. To do this, go to Host -> Host Settings (under the Other Settings tab), check the Allow Content Localization option and then click Update.

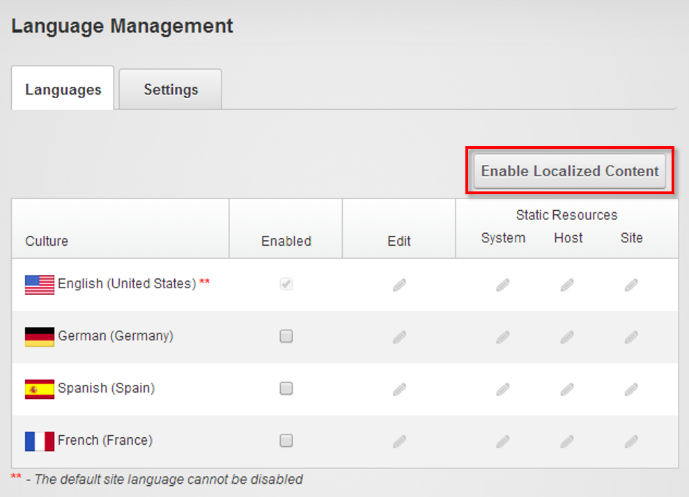
Now the localization feature will be available in the Language Management page.
To access this, open Admin > Language and click Enable Localized Content.
Note: you can’t change the default site language after enabling content localization, so make sure you have selected the correct default language before enabling the content localization.
After clicking Enable Localized Content, the below popup will appear:
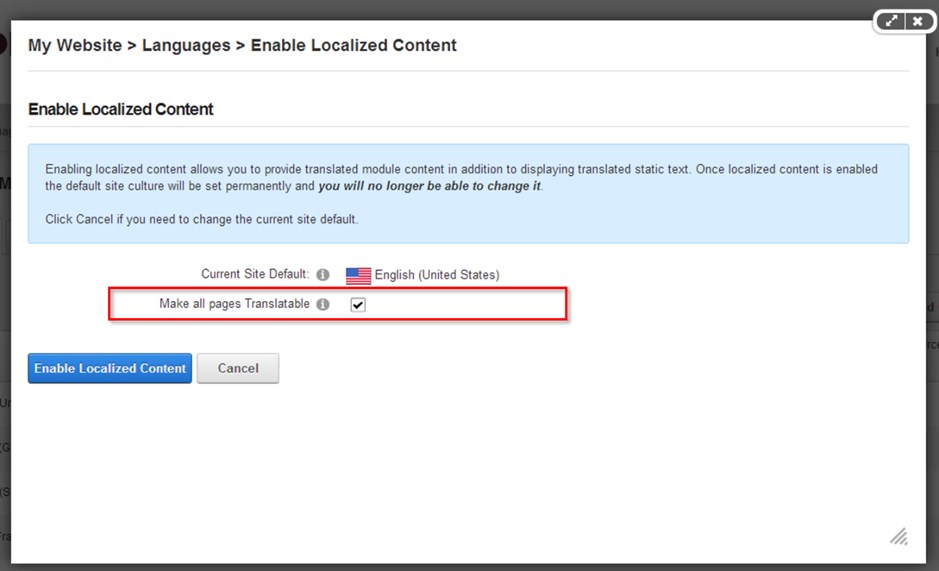
If you leave the Mark all pages Translatable checkbox unchecked, all of the pages will be language neutral, which means they will display in all languages. Check this box to make all pages available in only one language.
After checking the Mark all pages Translatable checkbox, the DNN localization framework will create a new copy of each page for each enabled language and a copy of all the module controls on each page.
All pages are now ready for translation. From the Languages page you can manage the content localization by enabling/disabling languages and activating/deactivating localization. The user can also see the number/percentage of all pages and the number/percentage of the translated pages.
Administrators and translators can work safely on the live website when the language is not activated and not published.
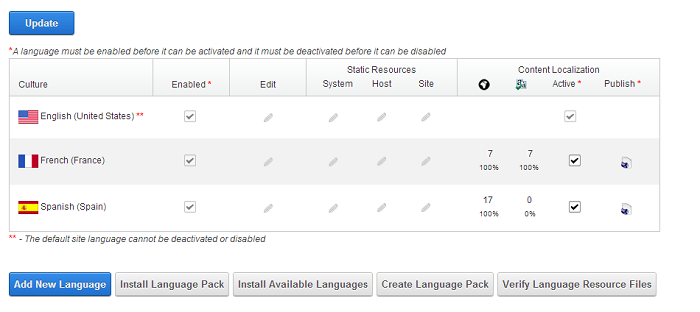
The translator can manage the translation of each page from the Localization tab of the page. After the translation is complete, you have to mark the page as translated by checking the Translated checkbox at the end of each language.
Publishing the language is the final step in the DNN localization workflow to make the translation available online for all your website’s visitors. You can publish the language from the Language page by making sure the language is activated and by clicking Publish under the Publish column.
Users of DotNetNuke’s CMS have an excellent built-in localization framework available to them to create multilingual versions of website pages. Following the steps I outlined above, you can easily enable DNN’s content localization feature and display translated versions of your content.