GPI Translation Services Connector for WordPress
WordPress is one of the most popular content management systems (CMS) available. As an open source software, it gets enhanced by community contributors who constantly create plugins and themes.
WordPress doesn’t support multilingual features out of the box, but there are plugins, like WPML, which allow the creation of a multilingual site. GPI’s Translation Services Connector for WordPress serves as a WPML translation service.
GPI’s connector enables users of WordPress-based websites to initiate translation workflows with a single click and gain access to an array of reports to track and manage global translation projects through GPI’s Translation Portal.
Getting Started
To send files for translation to GPI, you first have to log in to your wpml.org account, and download and install the following plugins on your website:
- WPML Multilingual CMS: the core plugin.
- WPML Translation Management: this plugin will allow you to connect to GPI.
- WPML String Translation: this plugin will enable you to translate interface strings.
Activating and Authenticating GPI
Log in to your WordPress website, visit the WPML->Translation Management admin page, and click on the Translators tab.
![]()
Scroll down to Available Translation Services and click Activate to activate GPI.
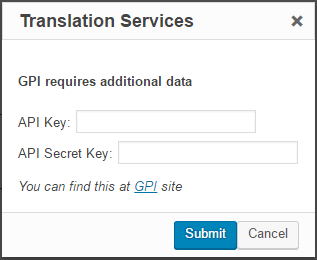
Once the service is activated, click the Authenticate button. This is where you will need the API Keys obtained in the previous step.

A popup window will appear in which you can paste or enter your GPI API Keys. After entering the values, clicking Submit.
Your GPI account is now connected to your WordPress account. Now you are ready to send content for translation.
Sending your Content for Translation
To send pages for translation, go to the Translation Management module WPML->Translation Management.

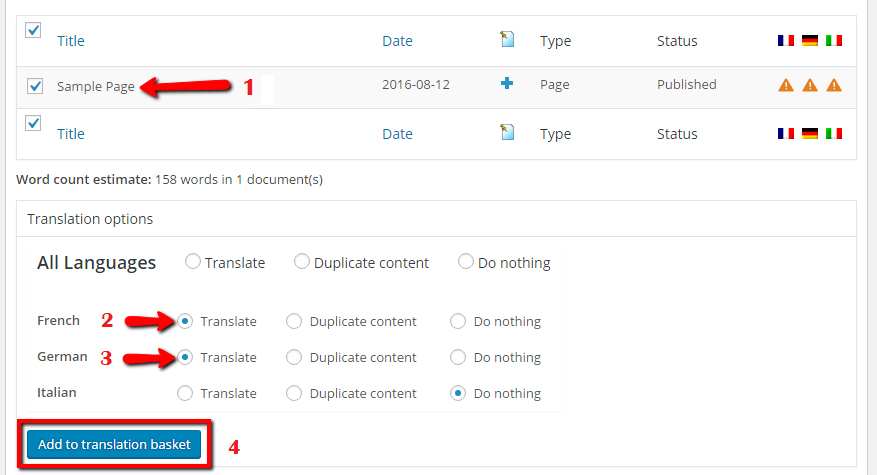
Select the pages you want to translate by clicking the check boxes in the first column. Next, select the target languages by checking the boxes and click the Add to translation basket button.
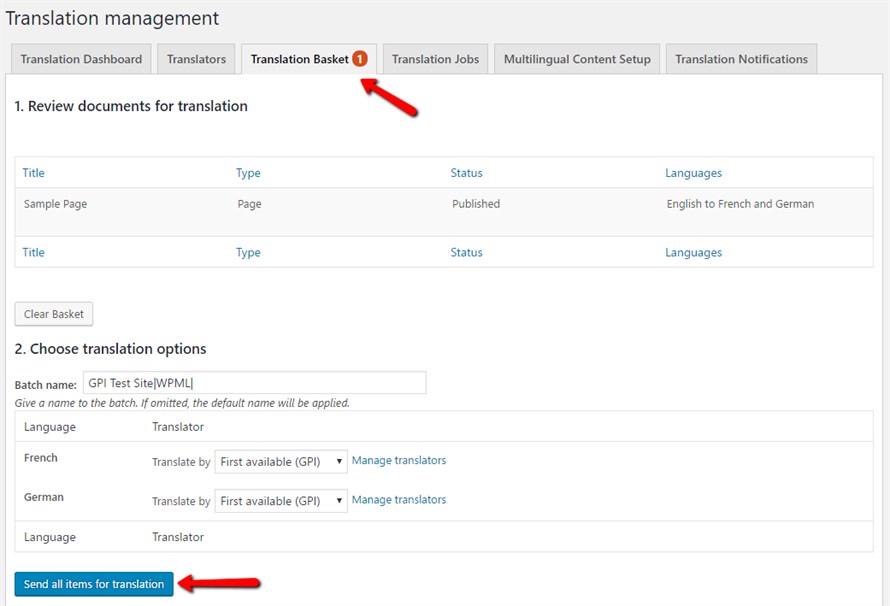
Go to Translation Management and click on the blinking tab at the top of the page, called Translation Basket. By clicking this tab, you will see a list of all the pages (jobs) that you added to the basket, as well as the languages these items are to be translated into.
Here, you can verify the content you wish to translate, remove pages you incorrectly added and change the Batch name. The Batch name will be visible on the Translation Jobs tab and will help you find projects. When you are ready, simply click the Send all items for translation button to send everything to GPI.
When the translation basket’s contents have been successfully sent to GPI, you will see a confirmation message, as shown in the following figure.
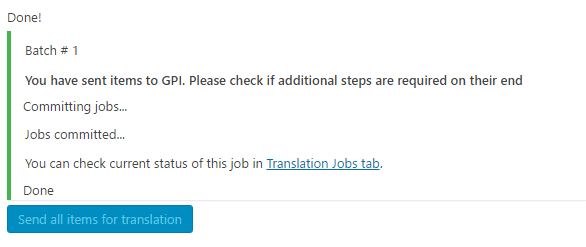
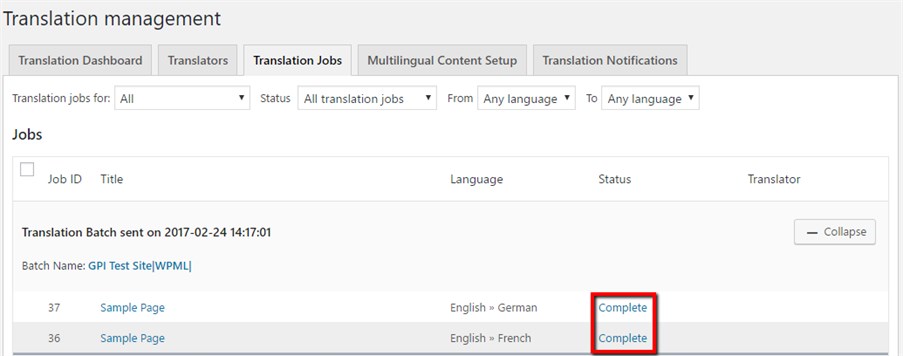
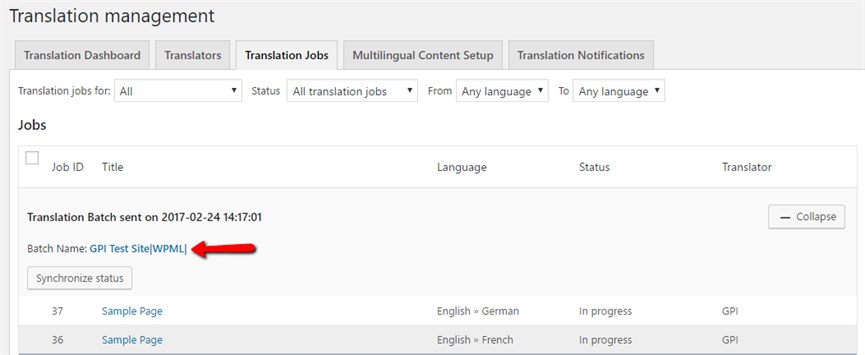
Click on the Translation Jobs link you are given in the confirmation message or click on the Translation Jobs tab at the top of the screen. From the next administration screen, you can see the Batch you just sent to GPI for translation.
Receiving Completed Translations
As soon as a translation job is finished by GPI, it will be ready to be delivered to your website and you will receive a notification email from GPI.
Go to the Translation jobs tab and click the Synchronize status button.
Depending on your configuration, translations will be delivered automatically or can be manually fetched from your WordPress admin panel after you click the Synchronize status button.
To check your configuration settings, open WPML->Translation Management and click on the Multilingual Content Setup tab. Find the Translation Pickup mode section and check the selected option.

- The Translation Service will deliver translations automatically using the XML-RPC option implies that a translation will be delivered to your website automatically after clicking the Synchronize status button.
- The site will fetch translations manually option implies that completed translations can be downloaded from the Translations Dashboard (WPML->Translation Management) by using the Get completed translations button at the bottom of the page after clicking the Synchronize status button.
![]()
Once the jobs are fetched, their status in the Translation Jobs tab will be changed to ‘Complete’.