Joomla CMS and Multi-language Websites (Part 1)
Joomla is an award-winning content management system (CMS), which enables you to build websites and powerful online applications. Many aspects, including its ease-of-use and extensibility, have made Joomla the most popular website software available. In addition Joomla is an open source solution that is freely available to everyone. (Joomla.org)

It was first released on September 22, 2005. The purpose of Joomla is to provide a flexible platform for digital publishing and collaboration. The name, “Joomla!,” is the Anglicized spelling of the Swahili word “jumla”, meaning “all together” or “as a whole” which also has a similar meaning in at least Arabic and Urdu. (Wikipedia)
The most recent and recommended release at the time of writing is version 3.2 and it was released on November 6, 2013. The Joomla platform has been downloaded more than 30 million times from Joomla.org and averages around 1 million downloads every month.
In this blog entry, we shall discuss using Joomla to support and manage multiple language websites. This will be the first post in a three-post series.
Preparing to support a multilingual site
Out of the box, Joomla comes installed in a single language but provides the basic fundamentals needed to support websites in multiple languages.
Adding a new language
Since Joomla generates specific language strings (e.g. “Read More”, etc.) on both the client-facing site as well as the administrative back-end, we first have to install the additional language packs for the language we plan to support.
To enable an additional language within Joomla, follow the steps outlined below:
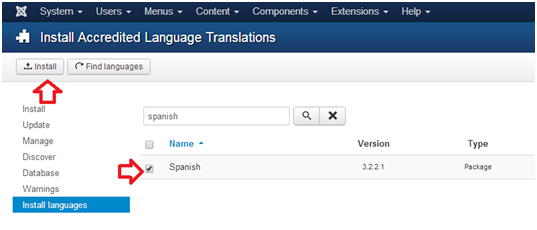
- Go to Extensions > Language Manager – To access the Language Manager section of the Joomla administrative area, simply click on the Extensions link at the top of screen as shown below:

- Choose your language(s) from the list of available languages.
- Click the Install Language button.

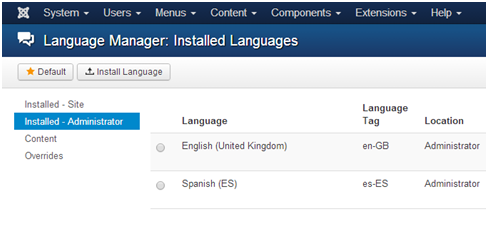
Once this is done, the new language(s) will appear under Extensions > Language Manager. It is seen under both under the Installed – Site and Installed – Administrator tabs as seen below.

Creating a content language
At this point, you have installed the required language packs for the languages you plan to support. However, we still need to configure these languages for use with your website’s content. This process is known as creating Content Languages in Joomla. Content Language captures the required details such as language codes, etc. on a per language basis.
- 1. Go to Extensions > Language Manager.
- Click Content on the left side-menu.
- Click the New button to create a new content language.
- Enter the details required for the content language.
- Title – This is the name of the language as seen within Joomla.
- Title Native – This is the name of the language using the language native text/script.
- URL Language Code – This is the code used to identify the language and appended to the page URL e.g. https://www.youcompanydomain.com/en/.
- Image Prefix – This is used to help display the count flag images.
- Language Tag – This is the language code in the format <language_code>-<country_code>. For example en-US: “en” represents English language code and “US” represents the United States country locale.
- Click Save & Close to update the content language settings.

Organizing content with language categories
Our goal is to configure Joomla to support a multi-language website. This means we will have content in each of the different languages we plan to support. As such, the amount of content quickly grows in proportional to the number of pages and the number of languages we will need to support.
In an effort to simplify our information architecture (content structure) as much as possible, the best approach would be to create root categories for each language supported on the website.
- Go to Content > Category Manager.
- Click the New button to create a new top-level category.
- Enter the details required for the language category.
- Title: English (root)
- Language: English
- Parent: (None)
- Click Save & Close.
- Repeat this process for each of your languages.
Once you have created the language categories, you can now begin creating your content. When creating your new content, you will need to make sure to assign each content type to one of the Language Categories and also select the appropriate language from the drop down language as well. See below for screenshot:
Selecting and switching between languages
Once you have enabled the languages for your site and configured your content to show in these languages, the final step involves providing a way for your website users to see your site in the language of their choice.
Filter a specific language
Out of the box, Joomla provides a language filter plugin. This useful tool enables the Joomla platform to distinguish between different installed languages and display the relevant content to the current language.
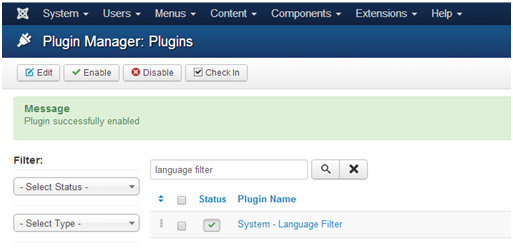
- Go to Extensions > Plug-in Manager.
- Enter Language Filter into the search box to find the plugin.
- Click on the plugin name to edit its settings:
- Status: Enabled
- Item associations: Yes
- Remove URL Language Code: Yes
- Click Save & Close.
Using the Language Switcher
This Language Switcher presents website viewers with a collection of links based on the languages enabled on the website. As such, your users can now manually select and switch between each of the languages available on your site.
To enable the Language Switcher, use the following steps:
- Go to Extensions > Module Manager.
- Click the New button to create of new module of type Language Switcher.
- Enter the details required for the Language Switcher:
- Title – The language
- Position – The location where it will be placed
- Click Save button.
The Language Switcher is now active and displays links to each of the languages on your site. When visitors click these links, the site switches to the selected language, changing all of the content and interface options for which translations are available.

