Creating Master Pages for your Template in FrameMaker
When beginning a new document project, you should always create master pages to ensure consistency and save time. Documents typically have a title page, TOC, LOF, LOT and a glossary or reference section. If you do not create master pages, you will have to create each page every time. In a 250 page document, this would not be very time effective.
In this blog, I will help you understand creating master pages, headers/footers and how to best set them up in portrait or landscape view.
Master Pages
To begin, you will want to view your master pages: View -> Master Pages (Alt v m). To go back to your body pages: View -> Body Pages
(alt v d).
You only need to set up your master pages once, which is why they are so important in your document. The title page will have all the relevant information and you will not be able to change this page or the structure unless you go into the master page’s template.
Now for the body of your document you will need to create another master page. Documents usually have a left and right page and so you will need a right master page and a left master page. This will have all the relevant information and will be formatted with headers, footers, text boxes and images boxes. This way your document will look consistent and uniform for every right and left page.
If you update a master page, all body pages are updated, but if you update body pages only that one page will be updated, creating an override.
Landscape Pages
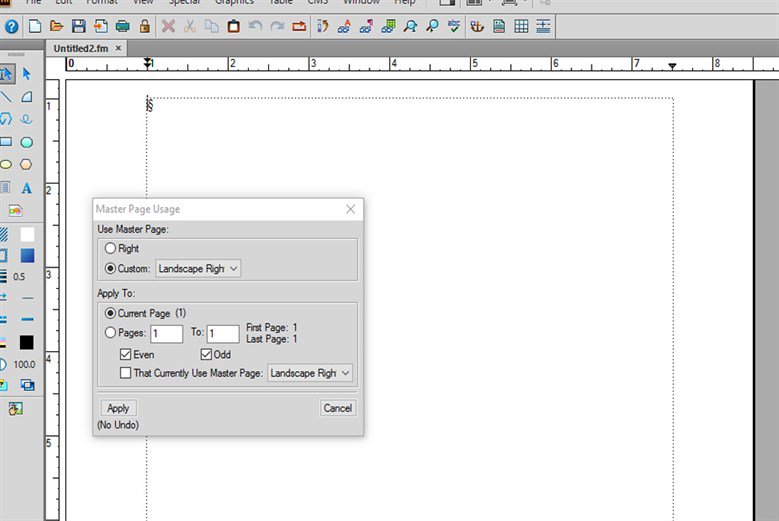
You can also create landscape pages in the master pages so when you want to use them in the chapter you just have to assign the page using Format-> Page Layout->Master Page Usage. This will give you a dialog box and will let you choose which master page you want to use, such as right or left landscape.
Headers and Footers
When setting up headers and footers on either a portrait or landscape page, make sure you have all your borders and symbols turned on so you can see where you are placing items. View->Borders or Text Symbols.
You can set up variables on each page like, page numbers and section titles. If you set up a page number variable on a master page, working within the Frame document will update your pages automatically.
The following shows how to set up the variable headers and footers:
View->Master page
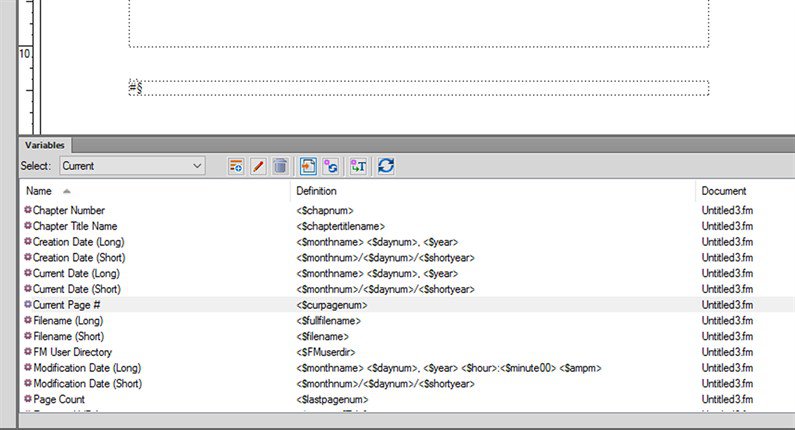
Select Text Frame tool from your toolbar (if it is not visible choose Graphics->Tools). Draw a text box where you want to put the text. A pop-up window comes up to ask you type: Click “Background Text” and then “Add”.
When your cursor is in the text box, click View->Pods->Variables. The variables pod will pop up on the bottom. Pick a variable and click the insert button, then insert it into your master page. See the screen example below:
Master page:
Go back to View->Body and you can see it added in the page number.
You can also do this with landscape pages using your portrait headers and footers.
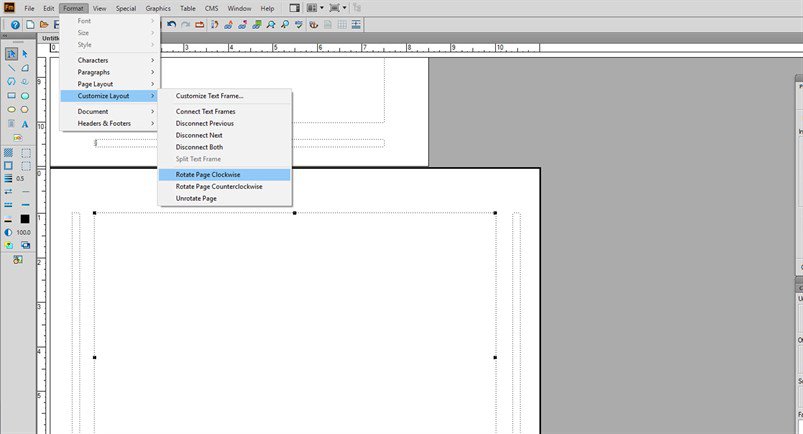
First, add a new master page by going to Format->Page Layout->New Master Page. Type in the new Name: Landscape Left and copy it from Master Page: Left. This will create a new master page. It will say the name in the grey bar on the bottom of your screen so you know which page you are on and which page you created.
To make it into a landscape page you can go into Graphics->Object Properties. You must click on the text box to switch the dimensions and then change the layout in Format->Customize Layout->Rotate Page Clockwise. You will then have your landscape page.
To delete a master page go into: Special->Delete Master Pages.
Summary
Knowing how to create master pages correctly is the first step in making your templates consistent. You should always start with this step before adding content so all of your pages are consistent with page numbering, product numbering, date or other variables important to your document that need to be represented on every page.