Optimizing Document Translation with Adobe Captivate Screen Captures
Captivate is an authoring tool designed to assist in creating multimedia eLearning content. If you need to develop branched scenarios for soft-skills training or create software simulations where you need to take a lot of the screenshots for complex branching, then Adobe Captivate is exactly what you need to use. Your translation services agency should also be familiar with Captivate and how to handle embedded rich media in FrameMaker files, destined for multiple delivery formats.
Captivate has a variety of features, including screen capture. You can learn how to use the screen capture feature of Adobe Captivate in a few relatively easy steps. Incidentally, Adobe Captivate will also automatically create “captions” for full motion software video and these captions can be easily exported for translation and imported “in place” with no copy/paste. Watch for a future blog on that specific feature.
Recording a new Captivate Project
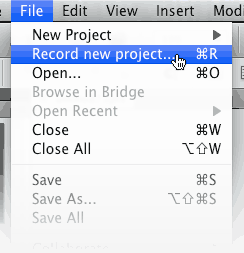
File > Record a New Project to start recording a project.
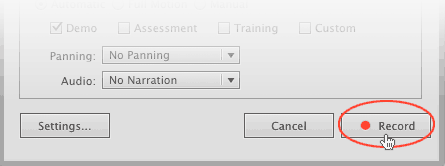
The Adobe Captivate application is minimized and a screen with recording options appears.
Select the window you wish to record from the “Select Application” drop-down menu. Select the type of recording you wish to execute: Demonstration, Training simulation, Assessment simulation or Custom.

Click Record. The countdown (from 3 to 1) for recording begins. At the end of the countdown, the application appears.
When you are done, press the End key (Windows) or Command+Enter (Mac OS) on your keyboard.
You can also record and add additional slides to an existing project.
Recording additional slides with Captivate
The following steps are appropriate for a project in which you want to record additional slides:
- Click the Record Additional Slides icon.
- In the Record Additional Slides dialog box, select the slide after which you want the recorded slides to be inserted and click OK.
- The recording window appears.
- Set the recording options and click Record.

The newly recorded slides are inserted into your project after the slide you selected.
Tip for capturing screenshots correctly
It is important to know exactly when Adobe Captivate is capturing screenshots. Adobe Captivate contains a feature that plays a “camera shutter” sound each time a screenshot is taken. This feature is enabled by default, but if you do not hear the sound, open the Preferences dialog box (Edit > Preferences).
- If you are automatically recording, Adobe Captivate captures a screenshot each time you perform an action such as moving the mouse, selecting a menu, or typing information into a text box. The camera shutter sound plays each time an action takes place.
- If you are manually recording, Adobe Captivate captures screenshots each time you press a designated key or key combination. Each time you want to capture a screenshot, press the Print Screen key (Windows) or Command+F6 (Mac); you’ll hear the camera shutter sound.
Exporting Captivate Screenshots
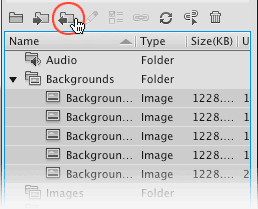
If you want to use the recorded screenshots for use in other applications like FrameMaker, InDesign or MS Word you can simple export the graphics in the Library:
- Select the graphics in the Library.
- Click in the Export icon.
- Then select the location for the graphics and the format that you want the images.
Use the ‘Recording’ feature in Adobe Captivate to demonstrate your actions in an application. When you record an application, Adobe Captivate provides you ‘slides’ for every screen that you accessed or invoked in the application. All actions, such as clicking of a mouse or a button, too are recorded and shown at the appropriate locations on the slides as ‘objects’.