How To Save Time by Using Notes and Comments Feature Directly With InDesign
InDesign notes and comments are widely used by publishers and large teams to save time and effort when collaborating on document authoring and creation. They are great features to keep track of all the changes identified by a user and they make it easier to exclude and/or discuss any comments with team members.
Let me take you through this interesting feature in InDesign.
Adding Notes
The Notes feature in InDesign uses the workflow user names to identify the author of a note or a tracked change. Notes and tracked changes are color-coded for each user as defined in Note’s preferences.
Notes can appear only in text and they can be printed only from the Story Editor. Also, they cannot be exported to PDF.
To add a note, select the “Note Tool” icon from the “Tool Panel”

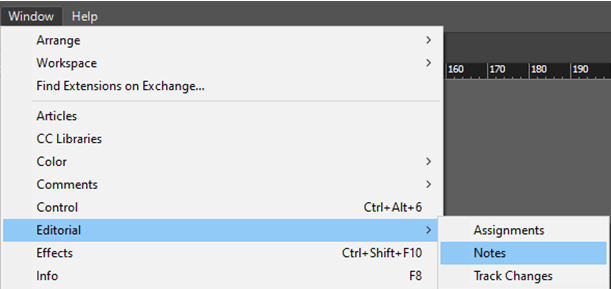
Or from Window > Editorial > Note

A text box will be created for you. Start creating a note. This is useful if you are trying to communicate with other people working on the same document, especially with people working on magazines, books, and other publications.

To input a note, use the “Type Tool” and click at a point where you want the note to be positioned. Navigate to the Notes panel and press the New Note button. Now add your note within the Notes panel.

You can also add a new note by right-clicking on the spot you want to add the note to and scroll down to New Note.

To view note markers within the Layout view, go to View > Extras > Show Notes. A barbell will appear within the Layout view indicating where you added the note.

Or you can view it from the panel

To change the color of the annotation, go to InDesign > Preferences > Notes. Use the drop-down menu to select your preferred color and click OK.


Another powerful feature of the note is that it enables you to keep the text that you are not 100% sure it should be deleted. Copy the text with the Type Tool, right-click and scroll down to “Convert to Note”. The text will be removed from the document and placed in the Notes panel.


To convert the note back to the text, navigate to the note marker via the Notes panel using the “Next/Previous buttons”. Go to the floating menu and select Convert to Text.


Import Comments From PDFs Created in InDesign
This is another interesting feature in InDesign called ‘Import PDF Comments‘. You can import comments you received on a PDF to your document, so you can keep tracking within the same tool. You can accept comments and mark them as resolved or unresolved. Selecting a comment also highlights the section in the document where the comment is applicable. To do this follow the below steps.
- Open the InDesign document for which you want to import the PDF comments. Do one of the following:
- Choose File > Import PDF Comments.

- Choose Window > PDF Comments and click Import PDF Comments.

- Browse for the PDF having comments for your document and click Import comments. You can import comments from multiple PDFs for your document. The comments are imported and displayed in the PDF Comments panel.

Manage Comments
PDF Comments Panel Overview
The PDF Comments panel displays all the imported comments. The total number of comments is displayed on top. All the comments are grouped based on the page number.
- PDF Comments panel menu

- Filter the comments based on their status, reviewer, type of comments, and PDF source of the comments.

- Review individual comments and mark them Resolved/Unresolved or Remove a comment.

- Search comments

- Number of comments

- Type of comment

- Show/Hide comments on the layout

Conclusion
Whether you work on your own or as part of a team, using the Notes and Comments features in InDesign will help you keep track of your work and collaborate better with any of your global team.
Keeping your comments and your head in one application will help you be more productive and focused on producing the best content and documents possible.
