Correctly Setting InDesign Tabs for Post-Translation Text Expansion
Incorrect use of tab settings in InDesign documents may lead to unnecessary formatting “cleanup” after document translation creates text expansion. Many of us heavily rely on the tab key to quickly align information. Most of the time we just use default tab settings in Word or InDesign. If the document were to eternally stay in the English language, or never have heavy editing, this would not be a problem.
But this is seldom the case anymore. Documents have longer life cycles, as text is more frequently repurposed. And in today’s global economy, you never know what portion of a document you author may be “borrowed” for other content destined for global markets. In those cases, something that is perfectly formatted with tabs in English may look downright ugly after it is translated. Read on to see how this blog will give you simple steps for properly defining and aligning tabs in your InDesign documents to avoid the problems mentioned above.
How translation and text expansion affects default tabs?
Any good language translation services agency is well aware of the potential problems with tabs. As mentioned before, a large percentage of word processor users or publishers simply use default tab settings and hit the tab key a number of times until the text moves to an attractive location. As illustrated below, this can lead to many problems, when there are “extra” tabs that need to be deleted after translating InDesign documents is complete.
At GPI, we frequently find InDesign documents with several tabs inserted between words using default tab settings. In most cases, the InDesign ruler could have been used to intelligently place tab settings.
In the example below, the first screen capture shows text that looks fine, in English, with default tab settings. But the second screen capture reveals what your translation agency will have to deal with when that text is translated into the Spanish language: there are too many tabs, and text is now out of alignment, with bad line breaks.
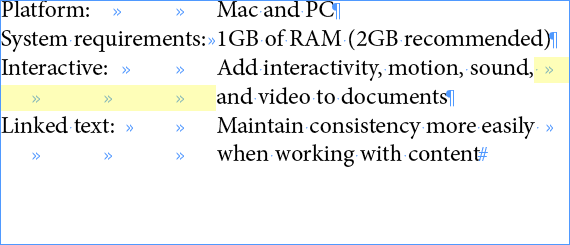
Wrong use of tabs – Original English source file.
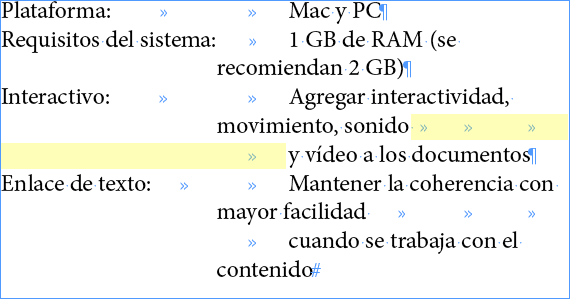
Wrong use of tabs – After translation into Spanish.
What tabs accomplish in InDesign with text placement
Tabs will position text at specific horizontal locations in a text frame. The default tab settings depend on the horizontal ruler units setting in the Units & Increments preferences dialog box.
How tab settings behave in InDesign
Tabs apply to an entire paragraph. The first tab you set deletes all default tab stops to its left. Subsequent tabs delete all default tabs between the tabs you set. You can set left, center, right, and decimal or special-character tabs in InDesign.
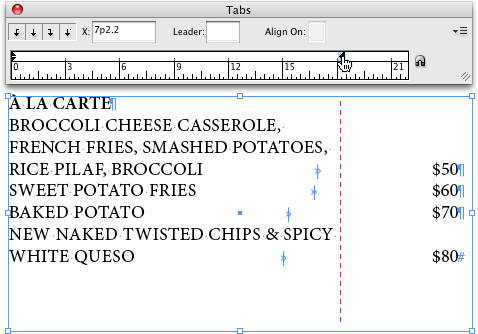
Open the Tabs dialog box
- Using the Type tool, click in the text frame.
- Choose Type > Tabs.
- If the top of the frame is visible, the Tabs dialog box snaps to the current text frame and matches its width to the current column.

Note: Click the magnet icon on the right side of the Tabs dialog box. The Tabs dialog box snaps to the top of the column that includes the selection or the insertion point.
Moving a tab setting
- Using the Type tool, click an insertion point in the paragraph.
- In the Tabs dialog box, select a tab on the tab ruler.
- Do one of the following:
- Type a new location for X and press Enter or Return.
- Drag the tab to a new location.

Deleting a tab setting
Click an insertion point in the paragraph. Do one of the following:
- Drag the tab off the tab ruler.
- Select the tab, and choose Delete Tab from the panel menu.
- To return to the default tab stops, choose Clear All from the panel menu.

Change a tab from one alignment to another
- In the Tabs dialog box, select a tab on the tab ruler.
- Click a tab-alignment button.
Right-indent the last line of a paragraph
You can use the Last Line Right Indent option to add a “hanging indent” on the right side of the last line in a paragraph. This option is especially useful for right-aligned prices in a sales catalog.
Last line right indent
- Type your paragraphs. In the last line of each paragraph, place the insertion point before the text to be indented, and choose Type > Insert Special Character > Other > Right Indent Tab.
- Select the paragraphs.
- To create a right indent for paragraphs, specify a value (such as 7p0) in the Right Indent field of the Paragraph panel or Control panel.
- To offset the right indent value for the text that follows the tab, type a negative value (such as ‑6p0) in the Last Line Right Indent field of the Paragraph panel or Control panel.

Your goal: simple, correct tabs that work with translated text
Using this simple InDesign tab tool in the right way enables you to have clean, flexible text formatting and save lot of time and money when you have to update or translate the content.
The screen capture below shows how the first screen capture of source English text should have looked, if its tab settings were properly defined. Text that has tabs and formatting like the example below is highly resilient; it can be swiftly touched up by your translation agency when text expansion occurs after language translation.
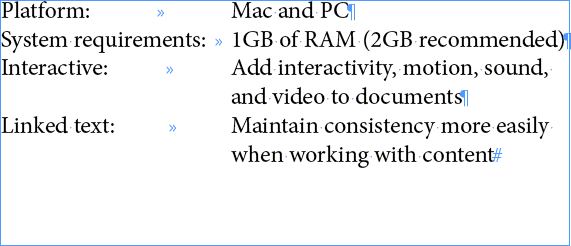
Correct use of Tab in English InDesign source file – Before Spanish translation.
Pro-active optimization of desktop publishing by your translation agency
This is just one example of how source documents should be optimized for translation, making sure that your text content is formatted as flexibly as possible. Multilingual desktop publishing not only includes reformatting of text after translation; it includes professional advice from your translation vendor before translation begins to ensure that your source files are properly formatted.
You may wish to review one of our previous blogs that covers problems with translated InDesign documents in which tabs were used to create “fake” tables: Optimizing InDesign Documents for Translation with Tables