8 Steps to Optimize InDesign Files for Translation
Adobe InDesign is a powerful and creative authoring tool. If you are creating an InDesign document that will only be released in English (or one language), you have tremendous freedom regarding the techniques you can use. When InDesign files are not translated, your content is relatively static and you do not need to give a great deal of thought to flexible layout or text expansion. When you are designing InDesign files that will go through document translation or graphic localization, however, you need to adhere to best practices in order to create documents with formatting and layout optimized for multilingual desktop publishing.
Intelligent use of white space in InDesign document layout
The biggest challenge in designing InDesign document templates for multilingual projects is creating page layout that will accommodate post-translation text expansion. It is not easy to create a source English document that has enough of white space or “breathing room” around text elements. Many languages (e.g. Russian, German, Italian, Latin American Spanish) can expand the line count by as much as 35%.
Language expansion is further magnified by narrow containers, e.g. side notes in the margin, table cells, indented text or boxed cautions and warnings. In addition, some eastern languages (e.g. Arabic, Farsi, Urdu) display text “right-to-left”; this requires right alignment and right-to-left layout modification. Text expansion and text direction require a flexible layout designed by professionals who understand the challenges of multilingual desktop publishing and graphic localization. Your translation company can be a great help in this regard.
Your translation agency or Language Service Provider (LSP) uses Desktop Publishing Specialists to provide corrective formatting to your InDesign document after translation. In extreme cases, this corrective formatting may almost constitute “document reconstruction.”
Best practices to optimize your InDesign documents for translation
There are many best practices to optimize your InDesign documents for translation, but here are some of the top techniques to use:
1. Use lists appropriately
Lists: When creating a numbered list, have all items in the list number automatically by using the Numbered List option, instead of manually typing in numbers. This will ensure that the list will be correctly numbered after translation. In case of text expansion, when one item may be shifted to the next page, the risk of errors or different formatting for continued numbers is eliminated.

2. Inline anchored frames
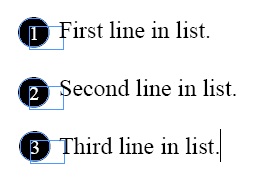
When using creative design elements in lists (e.g. white numbers grouped with black circles, see example below), make the graphic number an inline anchored frame that will paginate with the list item text. If graphic bullets or numbers are not anchored to their accompanying text items, a DTP specialist at your translation company has twice the number of elements to manually reposition on the page when text expansion occurs. Each “bullet” or “number” will have to be manually “nudged” to line up with the first line of each list item. This one feature can save hours in a project if your InDesign file is translated into dozens of languages.

3. Use separate paragraphs for any distinct style changes
Translation company DTP staff frequently encounter documents formatted without using paragraph styles. Frequently, manual format overrides are not preserved by translation tools. Furthermore, some parameters (font size and color) may change during post-linguistic engineering preparation of files. The lack of distinct paragraph styles (which can be globally updated to accommodate text expansion) can substantially increase billable time from translation company DTP staff after translation. Using well-defined paragraph and character styles can be a huge advantage for projects with a large number of documents with a common layout. These styles can be reused, saving time and money each time a new document is created.
4. Use real tables in InDesign
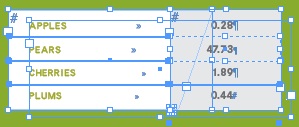
Use real tables:InDesign has an excellent tables package. Many InDesign authors are in a hurry and create “fake” tables from individual text frames delineated by manually drawn boxes and horizontal/vertical rules. A six cell table with text expansion created in such a fashion has ten elements (text frames, boxes and rules) for your translation company’s desktop publishing staff to manually resize. With real tables, all cells/containers and rules adjust themselves automatically to accommodate text expansion from translation. The screen capture below illustrates a case of “fake” tables in InDesign.

5. Create layers in InDesign
It is very easy to add layers to InDesign documents which can contain a text box over one or two graphics. This simple step will save a great deal of time during post-linguistic desktop publishing (DTP) conducted by your translation company. Click the New Layer icon and then you can add your different elements to different layers. Be sure that you always name the layers properly, according to their purpose or content. This will make your intent obvious to the translation agency desktop publishing team who will provide the localized versions of the document.
6. Use style sheets in InDesign
Style sheets are one of the most useful tools in InDesign. They allow you to apply or update complicated formatting with just few steps. They make it easy to change formatting globally throughout a document. Style sheets also let you know exactly which fonts and styles you have used in your document. So it is always better for designers to use style sheets instead formatting text manually.
7. Group elements which should stay together
When a group of inline elements (graphics and/or text boxes) should stay in fixed positions in relation to one another, it’s a good practice to group them. In this way you make sure grouped objects maintain their proper position when the text “moves” due to text expansion.
8. Link text frames when pagination should flow in InDesign
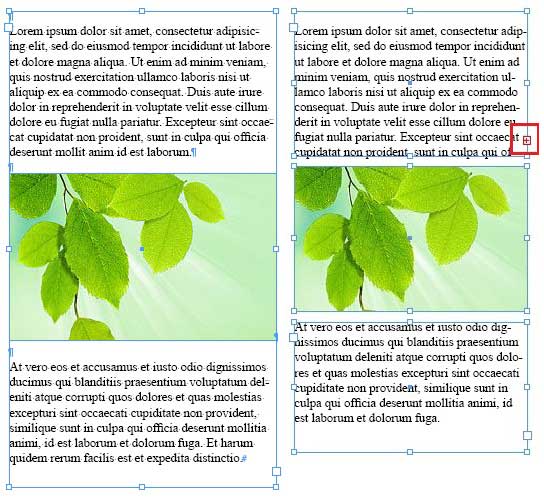
Sometimes, the layout of the page includes a graphic placed in between two paragraphs, for illustrating the text. The most common “solution” for this type of layout is to create two “unlinked” text frames, one above and one below the graphic or static element. When text expansion occurs after the file is translated, translation company DTP specialists will have to spend a considerable amount of time expanding the text boxes to make the text show, and adjusting the vertical position of the graphic and the second text box to accommodate the depth of the first text box. A better solution would be to place the graphic inline, in an empty paragraph, below the first paragraph. In this way, the graphic will move along with the text, and no adjustment will be necessary.
In the screen capture below, the image on the left shows the first scenario, where two disconnected text boxes are positioned above and below a graphic. In the image on the right, there is one text box with an anchored graphic between two paragraphs.

InDesign document translation and multilingual desktop publishing
After InDesign documents are created and approved by the client in the source language, clients usually submit these documents to their translation agency or translation partner to translate the documents into target languages.
The document translation and graphic localization process includes the following steps:
- Preparation of source documents for analysis and export/import procedures (pre-document engineering).
- Export of an InDesign file to INX format that can be accessed by translation memory applications.
- Text Translation by the professional translators.
- Import of the translated INX file into InDesign including links update.
- Adjustment of the document’s layout to match the source design look and feel:
- Fixing the spaces and checking for any expanded text.
- Selecting the language in the language menu for the localized text.
- Selecting the proper font for the localization process, some languages would require different fonts like Chinese, Japanese, Russian, Arabic, etc,
- Fixing the font, colors and line spaces.
- Checking the links if any links are included.
- For localized documents in Arabic or Farsi you will need to reverse the layout. InDesign-ME includes a reverse layout feature to revert the layout of a document when converting a Left to Right document (Roman) to a Right to Left one (Arabic, Hebrew, Farsi) or vice versa.
- Implementing the final linguistic and desktop publishing QA.
Overall goal for InDesign documents being translated
In summary, if you adhere to these best practices when authoring documents in InDesign that will be translated into target languages, you can save a great deal of time and money on your translation projects. The steps recommended above will avoid “document reconstruction” after translation, and let over 90% of your InDesign content be correctly formatted after translation, without intervention from your translation company’s DTP staff.
